Showing posts with label Tutorial. Show all posts

Wednesday, June 27, 2012

Pillow Sham Tutorial


        As soon as school got out, we jumped on all our DIY projects for the summer. The list is long and just keeps growing! Our first task was to conquer our basement. 
      Besides a few gallons of paint, we decided that some of the pillows needed some freshening up. My  and I went to Jo Anns and found this gorgeous durable fabric on sale. We even got a few yards of it. My task was to make pillow cases for all of the pillows.

I found another pillow sham we had to base mine off of. I wanted to do the whole cross over removeable thing.

You'll need probably less than a yard of fabric and a pillow.

I probably could have used a tape measure for this but it was better to see exactly how it was going to fit. Lay the pillow on one side of the fabric and fold the bottom up so that it's a little more than half way covering the pillow.

Lay the other side over and find the point where they overlap about 2 inches. This is going to be the length of the pillow. For the width just kind of gather up how much fabric will be required on either side of the pillow.

Cut out and iron the fabric. I left the selvage on the end since it's going to be hemmed.

Fold over, iron, pin, and sew the short ends.

Fold the prettier edge over around half way. This will be the edge that is exposed.

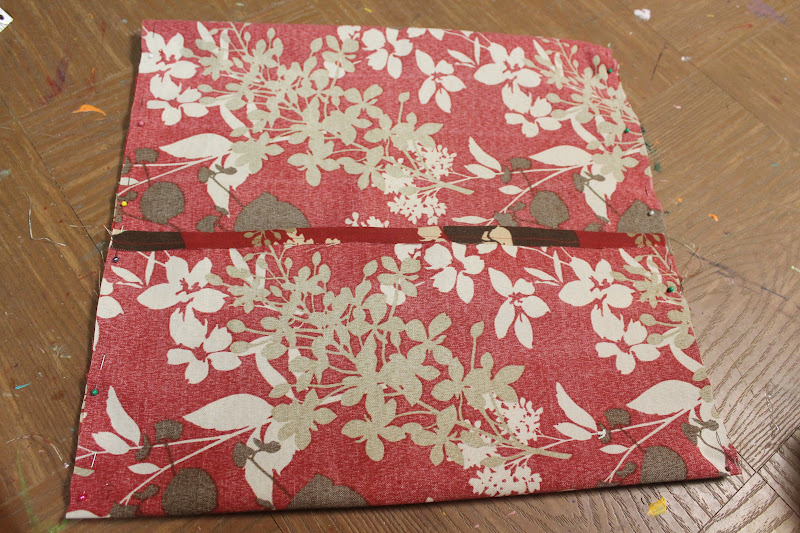
Fold the other edge overtop, making sure they overlap about 2 inches or so. Pin the sides and sew. 


Make sure to do a bit of backstiching over the flap since this will be tugged on a lot when the pillow is put in and taken out. 

Flip the pillow case inside out. It should look like this. Iron it if it's needed.

The pillowcase should be slightly bigger than the pillow to accomodate for some poof.

Insert the pillow. Here's the front:

Here's the back:

Here's the pillow in it's new home. Don't mind the fact that the moldning still needs to be put back on and that the table still needs to be redone and that the picture needs to be hung higher.

My pillow case turned out a bit big. I think that it makes the pillow look bigger. Right? After a recent outbreak of lice that somehow found it's way into our house, all the pillows had to be washed. I can't find the other pillows that actually go with the couch. This guy will be alone until then.

Saturday, May 26, 2012

Square Makeup Bag Tutorial


I found the idea for this over at Skip To My Lou
To make a pretty, boxy cosmetic bag, you will need:
  • 1 Zipper (I recommend one around 13-16 inches)
  • 2 pieces of Fabric (the length of your zipper by the length minus 2... i.e. for a 14 inch zipper, the fabric would be 14 x 12 inches)
  • 2 pieces of oil cloth of the same size as the fabric

I picked up an 1/8 of a yard of oil cloth at Jo Ann's for under $2, found an old 13 inch zipper, and then had some left over fabric that I had found at a garage sale.

Anyway, since my zipper was 13 inches, I cut my fabric and oil cloth into 2 13 x 11 inch of each.

So, start off with your zipper foot. You'll want to switch back later though.

I had to piece together my oil cloth since an 1/8 of a yard is only 9 inches wide and not 11. You can't even tell. So don't worry if you have to do this.


Lay your fabric face up. Lay your zipper face down with the zipper head on the left.

Lay your oil cloth face down on top.
 Make sure the far side of the zipper is lined up with the edges of the oil cloth and fabric.

Sew it up and flip it so that the zipper is exposed and the oil cloth is face down and the fabric is face up. Sorry I didn't take a picture of this next step.
Lay your other piece of fabric right side up. Lay the zippered piece face down with  the zipper on the right. Lay the final piece of oil cloth face down with the edges all lined up and then sew.

 Lay the pieces out with the zipper up. Lightly iron it if it is poofing up. Be careful of the oil cloth. I ironed mine a bit and it didn't seem to damage anything.

Flip it over and again iron if necessary.

Fold it in half like below with the oil cloth side outside and sew the bottom.

Cut off any extra fabric. Not all layers will end up the same length so be aware and make sure to sew through all of them.

Move the bottom seam until it lines up with the zipper like below.

Unzip it at least half way. Sew a seam down both sides like how my hand is pointing. Go over the zipper ends a few times to reinforce it.

The other side should look similar to this:

The top should look like this:

Poof it up. Mine was kind of heavy so it wouldn't stay up too well.

Pinch the edges in a vertical way. Choose a height for your bag. I picked 3 inches. Sew a seam that is that long.

Repeat on all four corners. It should look like this:

Clip off the corners.


Flip it inside out... and wallah!

My bottom seam was a bit off center from the zipper but it still looks pretty good.


Perfect for holding a bunch of random junk!

I wish I had cut the inside seam on the bottom a bit short but oh well.

The bottom looks nice though. I was worried about the oil cloth pattern showing through since the top fabric was really thin and see through but it didn't turn out too bad.

I still have no idea what to do with this! I don't know if I want to give it to a friend or keep it. We'll see.

linking up here

Monday, May 21, 2012

Scalloped Edge Skirt Tutorial

I found a tutorial for a Reversable Scalloped Edge Skirt and fell in love. My sister and a friend asked me to make them one and I agreed. The tutorial was pretty confusing. I convinced myself I could do it. And then once I was sitting there with my fabric in hand, I had this "yeah okay I'm winging this" moment. So I decided no reversable- ness. My fabric was pretty thick and my sister didn't want it to even be reversable so I just kind of said whatever. 


The first step is to take your measurements. My sister wrote these down for me so they're very messy. Anyway, Measure around the waist and hips. Then come up with the width that you'd like the skirt to be and the length. 

I ended up adding 5 inches to the waist and hips for gathering, making it wider for seam allowance and gathering, and then making it longer. Make sure you account for a tube for your elastic in the length. My elastic was 1 inch wide so I added on 1 1/2 inches to the length (I added and additional 1/2 inch so there's a bit of room for the elastic to slide through.)

The first step is to make a pattern. This is really just a guess, check, remeasure, scream, scream again, and redo process. Start out by dividing your  hips, waist, and width measures in half. Make sure there's an additional 5 or more inches for gathering.

NOTE: For this part I used half measurements and then folded it over to create a mirror image. You can do this or just use the full measurements and don't fold it over.

The top 1 1/2 inches with triangular ends will be folded over. Go about 3 or so inches down and mark the measure of the hips centered with the measure of the waist and then connect them to create and angle. Measure out you length and width and then with them centered, connect the two at a curve.  Leave extra room on the pattern piece for the scalloped edge.

The scalloped edge part is a guess too. I used the edge of a cup and traced it around. It took me a few tries to get the measurements I wanted.

I ended up with an extra half inch or so on one side. If that happens, just make that scallop a bit bigger to account for it. Don't just leave the extra space there.
 Cut out your pattern and wallah. That wasn't too bad was it? Who am I kidding. This is the hardest part of the entire skirt.

You'll need elastic (I used 1 inch wide) and some fabric. I bought 1 1/2 yards but I barely used any. I have enough left over for probably 2 more skirts. Anyways, if your fabric is thin or see through, you may want to even do a reverseable skirt. You can find a tutorial for that at Bored and Crafty.
 Okay so lay out your fabric, pin the pattern to it, and either trace around it and cut it out or just be spontaneous and cut it out. I like to be spontaneous. And sorry for the dark picture here.

Woo! You've made it this far? Things just get easier. Kind of.

The first part is to get those scallops hemmed. Use a piece of thin fabric. Pin it to the scallops and sew around them like bellow. I sewed on the scallop side so I knew where to go. As you can see they're not too pretty.

I had to use two strips but it doesn't make a difference.

Cut out all the fabric in between the scallops and around the edges. Here I haven't cut out the stuff around the edges. Fold them inside out and iron them flat. Sorry I don't have a picture of that. They may look bad at first but they will look a lot better when it's all done!


That extra fabric on the top? It's time to deal with that. Fold it down and iron it. Ignore the sharpee all over my hands please.

Make sure you fold it over on the same side that the back of the scallops are on. This will be the inside of your skirt.

You should now have a nice tube at the top for your elastic. My machine kept going crazy as you can see where the threads stick up. I really need to get my serger working. Grr.


Pin the right sides together and sew it down but don't sew the top part where the tube is just yet!

See leave it open! You may or may not have to do like 5 different seams. I kept missing one itty bitty little chunk. I don't think the seam will be coming undone any time soon.

A little bulging is fine. That whole curve thing? Yeah that's for the butt. This seam goes right on your butt.
 
Now is when you thread your elastic through.  Measure the elastic snugly around your waist. You can always make it tighter later but not any looser to bigger is better right now. Cut it and then thread it through. I recommend attaching a safety pin to one end and then thread that end through first. It'll make thing 100000000000000000000 times easier. Trust me.

There should be some bunching up occurring in the band because we accounted for this earlier.
 Hold both ends together with the skirt inside out and sew them together. Just go crazy here. Make it secure.

Now with it folded in half sew the hole closed. Yes this will keep the elastic in place.


If the butt is a bit too poofy, don't worry!

Just go back and move the back seam in a bit. I moved mine in a half an inch or so and it was perfect.

See the scallops don't look too bad!

I had my sister get quite dressed up for this as you can tell.
  J
ust kidding.


Woo. I start my new tutoring job tomorrow. I'm pretty excited. Have a good day everyone!

Linking up here
Related Posts Plugin for WordPress, Blogger...